



The weekend is supposed to be about relaxation. You have the SUV. The boat is loaded. The kids are covered in enough sunscreen to last a lifetime. You are the designated driver, the loadmaster, and the head mechanic, all rolled into one. Hook up the ball? Easy. Get the chains tight? Done. Then you hit the wall that breaks more than one marriage: the electrical connection.
Your truck has a socket. The trailer has a plug. They don’t match.
You spend twenty minutes cursing under your breath while your family watches in silence. It’s embarrassing. It’s dangerous. And it’s entirely preventable if you understand how trailer wiring actually works.
Every state in the U.S. has its own specific towing statutes. Some care about tongue weight. Others obsess over brake controller placement. But there is one non-negotiable rule that applies from Maine to Hawaii: your trailer lights must be wired to your vehicle. If you can’t see your brake lights from behind, you can’t tow. Period.
Most modern vehicles designed for towing come with a pre-wired harness. You just plug it in. But if you are driving a truck that hasn’t seen much action or an SUV that was never intended to haul tons of fiberglass and water, you are likely looking at a bare metal frame and a confusing mess of wires.
Why does this matter? Because if a car behind you doesn’t know you are stopping, they will rear-end you. That isn’t just about towing safety; it’s about basic survival. Proper trailer electronics ensure that every turn signal, brake tap, and hazard flash is transmitted from your tow vehicle to the trailer.
Getting how to wire your trailer to your vehicle correctly is the first step toward a stress-free trip. It isn’t rocket science, but it is technical enough that doing it wrong can fry your vehicle’s computer or cause a fire. Let’s break down the basics of trailer lighting so you don’t have to guess.
Trailer Lighting
A standard trailer light assembly is more than just a bulb. It is a complex circuit that requires precise power distribution. The most common connector types are the 4-pin and the 7-pin flat plugs, though round connectors exist for heavy-duty use.
4-Pin Connectors
These are standard for small utility trailers or boat trailers without electric brakes. They carry:
* Ground (White wire): The return path for the electrical current.
* Tail/Running Lights (Yellow or Brown wire): Powers the side markers and rear lights when headlights are on.
* Left Turn/Brake (Green wire): Handles both signals on the driver’s side.
* Right Turn/Brake (Red wire): Handles both signals on the passenger’s side.
7-Pin Connectors
These are used for larger trailers, RVs, and boats with electric brakes. They include everything in the 4-pin system plus:
* Backup Lights (Blue wire): Illuminates reverse lights.
* Electric Brakes (Blue wire): Sends power to the trailer’s brake actuators.
* 12-Volt Auxiliary Power (Black wire): Charges the trailer’s battery for interior lights or other accessories.
* **Ground (White wire
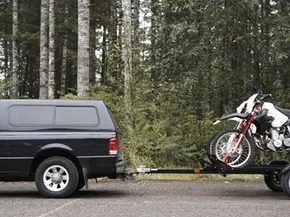

If you are hitting the road with a load, your trailer lights have to work. Period. Most setups rely on three core circuits to keep you legal and visible. You have one wire for the taillights, another for the left brake signal, and a third for the right brake signal. When you signal a turn, the brake light on that side flashes in unison. It seems simple, but it is the primary defense against rear-end collisions.
You also need a ground wire. This isn’t just extra copper. It creates an independent path for current, stopping electrical surges from frying your system or causing shorts. Without it, things get messy fast. This requirement means your trailer plug needs at least four contacts. The standard flat connector uses exactly four pins arranged in a row, plus the ground connection. It is straightforward. It works.
But not all plugs look the same.
Which Connector Fits Your Setup?
You will often see round connectors with five, six, or seven pins. They plug in like a standard household socket. So why upgrade from four? The extra pins handle additional circuits. Larger trailers often need separate power for side markers and front clearance lights. If you are hauling a horse trailer or a car hauler, you might even run interior lights off the tow vehicle’s battery. Each of these extras demands its own wire and pin.
If both your truck and trailer already have four-pin plugs, the job is usually a two-minute plug-and-play. Test it immediately.
- Turn on your headlights and verify the trailer taillights illuminate.
- Tap the brakes and confirm the trailer brake lights respond.
- Activate each turn signal to ensure the trailer flashes in sync.
If all three checks pass, you are good to go. But what if your truck has a seven-pin round connector and your trailer uses a four-pin flat plug? You need an adapter. Head to an auto parts store and ask for a “seven-pin to four-pin trailer wiring adapter.” Most stores will have them in stock. You can also find them online if you want to save the trip. Just make sure the adapter is rated for the current your trailer draws.
When Your Vehicle Isn’t Pre-Rigged
Not all trucks come ready to tow. If your vehicle lacks a factory-installed wiring harness, you cannot simply plug in. You need a trailer wiring kit. These kits usually include a connector that mounts to your frame or bumper, a fuse tap to connect to your battery or fuse box, and the necessary wire to run the signal to the hitch area.
The installation is more involved than swapping plugs. You will need to run wires along the frame, secure them with zip ties, and protect them from chafing. The fuse tap ensures you draw power safely without blowing a factory fuse. If you are not comfortable working with vehicle electrical systems, this is where you hire a professional. A poorly installed harness can drain your battery or cause a fire.
Reading the Wires
Once you have the physical connection, you need to understand what each wire does. Color coding can vary by manufacturer, but there are general standards. In a four-pin flat connector:
- Brown is typically for taillights and side markers.
- Yellow usually powers the left turn and brake light.
- Green handles the right turn and brake light.
- White is the ground.
If you have a five-pin setup, the extra pin often carries power for auxiliary circuits, such as a brake controller or battery charge line. Always check your trailer’s manual. Don’t guess with colors.
Common Wiring Mistakes
Many DIYers skip the ground check. A poor ground causes flickering lights, dim taillights, or complete failure. It is the most common cause of trailer lighting issues. Clean the connection point on the trailer frame. Use a wire brush to remove rust or paint. Ensure the bolt is tight. A dirty ground is a bad ground.
Another mistake is running wires through areas with moving parts. Exhaust pipes, suspension components, and door hinges can chew through insulation. Use split loom tubing to protect
DIY Trailer Wiring: The Plug-and-Play Solution
Your car wasn’t born with a towing package? No panic. You can still haul your boat to the lake without taking out a second mortgage. You just need a trailer wiring kit. You can install it yourself or pay a pro. The result is the same.
Finding the right kit is the first hurdle. Head to an auto parts store with a solid inventory or order online. You need a kit specific to your vehicle’s make, model, and year. Modern kits are smart. They skip the messy work. No splicing wires. No soldering. No electrical tape. You are looking for a T-harness or a T-connector.
A T-harness is elegant in its simplicity. It has two plugs for your taillights. These connect to a single plug that goes to your trailer. Each side plugs into your existing taillight sockets. The original car plug then slots into the harness. It’s a bridge.
Accessing the Taillights
Getting the T-connector in place is mostly about access. You need to reach the rear taillights from inside the vehicle.
If you drive a wagon, it’s easy. Lift the trunk carpet. You’ll find the spare tire and jack area. There might be a molded plastic shield covering the taillight access panel. Pop it out. It snaps back in.
Some SUVs don’t give you trunk access. Here, you have to remove the entire taillight housing. A screwdriver does the trick.
Once the light is exposed, look for the wiring plug feeding into it. This cable comes straight from the car’s electrical system. Unplug it. Plug in your T-harness. Then, plug the car’s original wire into the harness. Do this on both sides.
Now for the ground wire. It usually has a metal loop at the end. Find a bare metal spot on the trunk base. Drill a hole. Drive a screw through the loop. Secure it. You’re wired.
Stow the excess wire and plug under the trunk storage. Keep it with the jack. When you hit the ramp, pull it out. Close the trunk on top of it. You won’t damage the system.
When to Call a Pro
Old cars? Messy trailers? Sometimes DIY hits a wall. If your vehicle is vintage or the trailer has a spaghetti junction of wires, take it to a mechanic. Otherwise, it’s plug and tow.
Understanding Trailer Plug Configurations
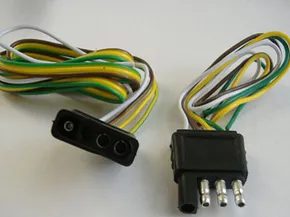
Trailer wiring isn’t one-size-fits-all. Plugs come in various sizes. The standard is the four-wire system. It uses a color-coded setup.
- Brown: Tail lights, license plate, side markers.
- Yellow: Left brake light and turn signal.
- Green: Right brake light and turn signal.
- White: Ground wire.
Most boat trailers and small utility trailers without brakes use this “flat-four” configuration.
You’ll hear these referred to by their “poles.” A pole is just a wire. Four wires mean four poles. Need more power? Look at the other options.
Five-Wire Systems
Identical to the four-wire setup. Plus one extra wire. This fifth wire is blue. It controls hydraulic disc brakes or auxiliary outlets. Think interior trailer lights or extra side markers.
Six-Wire Systems
Two extra wires. You still have the blue wire for brakes or auxiliary power. Add a red wire. This provides a 12-volt feed. You can run a cigarette lighter or power a car alarm system from the trailer.
Seven-Wire Systems
Same as the six-wire setup. Plus one more pole. This final wire powers interior and exterior lighting on the trailer. This is the standard for camper trailers, RVs, and large cargo trailers.
Auto wiring can confuse novice trailer towers. Don’t just buy the first harness you see. Talk to an expert. Your mechanic knows your car. The guy at the auto parts store knows the plugs. Check manufacturer websites for details. Ask questions before you spend.
For more on towing your boat and linking gear to your vehicle, check the next page.
The Wiring Gauntlet
Let’s be honest. The electrical side of towing is where most people hit a wall. You’ve got the hitch. You’ve got the tires. But then you look at that bundle of colored wires and wonder if you need an electrical engineering degree to just get your brake lights to work. You don’t. But you do need to understand that a loose connection isn’t just an annoyance—it’s a legal liability.
The standard interface is the 7-pin round connector. It’s the industry norm for heavy duty setups. If you’re using the older 4-flat, you’re limited. Tail lights. Turn signals. That’s it. No brakes. No backup. For anything substantial, you need the 7-pin.
Here is how the pins break down. Don’t just guess.
- Pin 1: Left turn and tail light.
- Pin 2: Electric brake controller output.
- Pin 3: Ground. This is non-negotiable. A bad ground causes flickering, phantom lights, and fried controllers.
- Pin 4: Right turn and tail light.
- Pin 5: Auxiliary power (12V). For battery chargers or auxiliary brakes.
- Pin 6: Electric brake output (secondary). Used on some 6-pin setups or as a backup.
- Pin 7: Battery charge line (constant 12V). Keeps the trailer battery topped up.
If your lights are dim, check the ground first. Ninety percent of the time, it’s corrosion on the frame. Scrape it. Tighten it. Re-test.
Troubleshooting the Dark
You plug in. Nothing happens. Or worse, the lights work but the turn signals act like strobe lights. How do you fix it without calling a mechanic?
Start with the vehicle side. Is the fuse blown? Check the owner’s manual for the towing fuse location. Usually, it’s in the interior panel or under the hood. If the fuse is good, use a test light. Touch the probe to the pin. See if you get power when you activate the signal.
If the vehicle side is live but the trailer side is dead, the fault is in the trailer. Check the connection at the hitch ball. Is it corroded? Clean it. Then move to the trailer’s own ground strap. It needs a clean, bare-metal connection to the frame. Paint is an insulator. Get rid of it.
For those wiring their own setup, the sources point to a few reliable guides. Popular Mechanics has a solid entry-level piece by Mike Allen on wiring the hitch itself. TrailerWiring.com offers diagrams for the DIY crowd who want to bypass the factory module. RoFB.net dives into specific troubleshooting for intermittent issues. And Helium provides a step-by-step for hard-wiring a car if you’re doing a custom install.
Where to Look
You don’t need to buy from a dealer. Several sites specialize in this. Haulmark covers the trailer side. etrailer.com is a goldmine for parts and how-to videos. Towing.com and TowingWorld.com offer broader advice on the mechanics of the tow.
When you’re shopping for wiring kits, look for heavy-gauge wire. 1


