



You don’t need to drive a truck loaded with volatile nitroglycerin through a jungle to feel the chaos of a bad road. You just need to drive a car with worn-out suspension hardware. When the asphalt gets rough, your vehicle’s ability to stay planted depends entirely on its components holding firm. Most people blame the shock absorbers or the springs when a ride gets choppy. They rarely look at the bolts. Yet those bolts are the literal anchors. Without them, the suspension floats away.
Suspension bolts are thick metal rods. They look simple. They act complex. One or both ends feature spiral grooves. This threading allows the bolt to slide through metal plates. It then screws firmly into a nut on the other side. This connection ties the suspension directly to the vehicle chassis or the wheel assembly. If that connection fails, you lose control. You lose stability. You lose the ability to steer.
Not all suspension bolts are created equal. The right choice depends on the load and the stress points of your vehicle. Here is what you need to know about the specific types that keep your car from falling apart.
Type 1: The Standard Hex Head Bolt
This is the workhorse. You will find these in nearly every suspension assembly. They have a hexagonal head. This shape allows a wrench to grip and turn the bolt easily. The threaded shaft runs the length. The head sits on one side of the metal bracket. The nut secures it on the other.
Standard hex bolts are cheap. They are replaceable. They are everywhere. If your control arm bolt snaps, this is likely what you will replace it with. They handle high tensile strength. They resist shear forces. But they are not always the best solution for tight spaces.
Type 2: The Flange Head Bolt
Flange head bolts add a flat washer-like extension under the head. This design spreads the load. It prevents the bolt head from digging into the metal bracket. It also reduces the chance of the bolt working loose over time. The flange provides a larger bearing surface.
These bolts are common in modern vehicles. Engineers use them where space is limited. They eliminate the need for a separate washer. This saves assembly time. It also reduces parts count. Fewer parts mean fewer things to lose during maintenance.
Type 3: The Shoulder Bolt (or Shoulder Screw)
Shoulder bolts are different. They have a smooth cylindrical section between the head and the threads. This shoulder acts as a bearing surface. It allows parts to rotate around the bolt. This is critical for ball joints and pivot points.
Without a shoulder bolt, metal would grind against metal. Friction would increase. Wear would accelerate. The shoulder bolt keeps the moving parts aligned. It allows smooth rotation. It handles the weight of the vehicle. It also resists bending.
Type 4: The Grade 8 or High-Strength Bolt
Not all bolts are equal. Suspension bolts must handle extreme stress. They must resist bending, twisting, and breaking. Grade 8 bolts are marked with six radial lines on the head. They are made from medium carbon alloy steel. They are heat-treated. They have higher tensile strength than standard bolts.
Using a standard bolt on a critical suspension component is a mistake. It might hold for a while. It might look fine

Connecting a real suspension system to a vehicle or trailer isn’t as simple as snapping together toy blocks. It requires specific hardware designed to handle torque, vibration, and heavy loads.
Building a model car is forgiving. Snap the wheels on, roll it across the floor. Done. Real engineering doesn’t work that way. When you’re dealing with a full-sized vehicle or a heavy-duty trailer, the connection between the chassis and the wheel assembly must survive thousands of miles of potholes, braking, and cornering. It relies on a handful of specialized bolts, each with a distinct job.
If you’re looking into types of suspension bolts for a restoration or modification, you need to know exactly what you’re looking at. Generic hardware store bolts will fail. The system demands precision.
Shackle Bolts: The Hinge Point
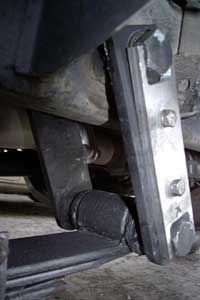
Shackle links are a common way automakers, particularly in older trucks and some modern off-roaders, connect the body to the leaf spring suspension. Look at a shackle assembly. One end hinges to the frame. The other end hinges to the leaf spring.
The bolt running through this hinge point bears the brunt of the articulation. Nuts screw down over the ends to keep the bolt from sliding out under vibration. But the real secret isn’t the nut. It’s the grease. Without lubrication, metal grinds against metal. The shackle seizes. The suspension loses travel.
Shackle bolts must allow free movement while maintaining structural integrity. If you’re replacing one, don’t just tighten it down. Pack it with grease.
U-Bolts: Clamping the Axle
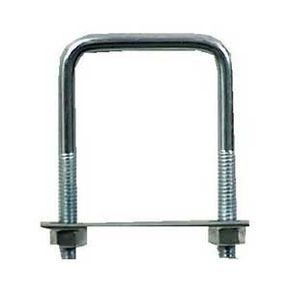
You’ve seen these before. Horseshoe-shaped bolts that wrap around the axle tube. They are the primary method for fixing bow-shaped leaf springs to the axle.
Here is how they work: the U-bolt loops over or under the axle. The threaded ends pass through a metal plate (often called a spring clamp or U-bolt plate) and screw into nuts on the other side. This arrangement squeezes the leaf spring snugly against the axle.
The tension matters. Too loose, and the spring shifts, causing clunking and uneven wear. Too tight, and you might distort the axle or crack the spring. Proper torque is non-negotiable here. If you want to understand the mechanics behind this, understanding how leaf springs work is essential context for why these bolts are under such constant stress.
Spring Eyebolts: Anchoring the Ends
While U-bolts hold the center of the spring to the axle, the ends of the spring need a place to go. They can’t just float. Enter the eyebolt.
These bolts attach the ends of the leaf spring to the vehicle or trailer frame. The design is simple but effective. The bolt slips through a round eye at the end of the leaf spring and then through a corresponding hanger hole on the frame.
The eye allows for slight rotational movement as the spring compresses and extends. If you try to replace an eyebolt with a standard hex bolt, you’ll introduce binding. The suspension will fight against itself. Keep the eye design. It’s there for a reason.
Spline Bolts: Anti-Rotation
Sometimes, you need a bolt that stays put when you turn the nut. Standard bolts rotate with the

Don’t Jack Up the Wrong End of the Truck
You’ve got the hardware. You’ve got the wrench. You’re ready to bolt everything together. That’s the easy part. The hard part is making sure you aren’t using a shackle bolt where a control arm bolt should be. Suspension components are not generic. They are engineered for specific stress points and movement patterns. Swap them out blindly and you are asking for failure. If you are replacing a bolt, verify the grade, the thread pitch, and the length. One millimeter off and you are stripping threads or compromising the chassis.
Work on the ground. That sounds obvious until you are three hours into a job with a jack stand wobbling because you put it under the lower control arm. Don’t do that. The suspension is heavy. The frame is heavier. Lift the frame. Lift the body. Let the suspension hang loose or rest on a stable, non-moving support. If you lift the suspension itself, you are fighting gravity with the wrong part of the vehicle. Support the heaviest solid points. This keeps the lighter suspension components accessible and safe to work on.
Grease or Seal It
Not all bolts are created equal. Some just sit there. Others move. Shackle bolts rotate. Bushings compress. Friction kills suspension performance. If your bolt is supposed to pivot, it needs lubrication. Modern vehicles often seal these joints for life. You don’t touch them. You drive until they leak or break. But if you are running an older truck or a heavy-duty trailer, you likely have grease zerks sticking out of the bushings.
Those are grease nipples. Also called grease fittings. They look like tiny metal spikes. A grease gun tip slides right onto them. If your rig has them, you need to pump them. Use the manufacturer-recommended lubricant. Don’t guess. Overfilling can burst seals. Underfilling leads to dry metal-on-metal wear. If you have zerks, you have maintenance. Schedule it.
Keep Rolling
Once the bolts are torqued and the grease is in, the suspension holds the line. But the job isn’t done. You still need to know how to handle the vehicle once it’s back on the road. Towing changes everything. Weight distribution. Braking distance. Turning radius.
- How Car Suspensions Work
- How Grease Caps Work
- How Leaf Springs Work
- How Trailer Bearings Work
- How Loading and Unloading Towed Vehicles Works
- How Backing Up Towed Vehicles Works
- How Boat Towing Safety Works
- How Launching a Boat Works
- How to Brake While Towing
- How to Shift While Towing
- How to Turn While Towing
- How to Pass While Towing
Need parts? Etrailer.com has the inventory. The sources for this stuff are solid. 4Crawler has the custom shackle data. Car Bibles covers the suspension bible basics. Cerka Industries has the trailer maintenance specs. Read them. Learn how the leaf springs load. Learn how the bearings spin.
The road doesn’t care if your bolts are tight. It only cares if they are.


